
The Best Headset For Call Of Duty PS4
Call of Duty is the best first-person shooting video game played by millions of gamers across the globe that is developed by Infinity War and published by Activision. The newest addition to the series, Call of Duty: Black Ops 3 was released for Microsoft Windows, PlayStation 4, and Xbox One. That's why the LucidSound LS41 Wireless is one of the best headsets for COD PS4
The game is praised for its innovation and realistic gameplay, making it a popular choice among gamers. To play Call of Duty on your PlayStation 4, you need a good call of duty headsets to communicate with other players in the team so that you don't have to rely solely on text messages. If you are looking for a the best call of duty headset, read on to find out which is the best one.
Microphone Quality.
A gaming headset needs to provide excellent sound quality so that you can play even better and aim with precision. A durable PS4 headphone with booming bass and clear treble will help you a lot.
Ease of Use.
The one thing that many gamers miss is the ease of use factor. They look for a durable headset with good sound quality, microphone and comfort but they don't even consider if it is easy to set up, store and handle or not which is why it becomes cumbersome for them to use it. You should never forget this factor when buying a durable headset for your PlayStation 4 console.
Headsets for Call of Duty Reviews
Best Call of Duty PS4 Headset Reviews
| Image | Title | Prime | Buy |
|---|---|---|---|
 Top Top Top Top | LucidSound LS41 Wireless Surround Sound Gaming Headset for PlayStation 5, PlayStation 4, PS4 Pro, Xbox One, PC, Nintendo Switch, Mac, DTS Headphone: X 7.1 Gaming Headphones | PrimeEligible | Check Price |
 Top Top Top Top | Razer Kraken Tournament Edition THX 7.1 Surround Sound Gaming Headset: Retractable Noise Cancelling Mic - USB DAC - For PC, PS4, PS5, Nintendo Switch, Xbox One, Xbox Series X & S, Mobile – Black | PrimeEligible | Check Price |
 Top Top Top Top | XIBERIA Wireless Gaming Headset for PS5,PS4,PC with Microphone,Lossless 2.4GHz Ultra-Low Latency,Noise Cancelling MIC,Long Battery Life,Wired Mode for Xbox One, Xbox Series X Games | PrimeEligible | Check Price |
 | PDP Gaming LVL50 Wireless Stereo Headset With Noise Cancelling Microphone: Black Camo - PS5/PS4 | PrimeEligible | No Results |
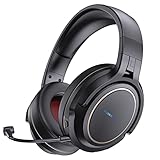
Gives you a competitive edge while playing Call of Duty on your PlayStation 4 as it has been designed for gamers who want the best quality headset. The high-quality 40mm directional drivers offer a Hi-Fi surround sound feature, which enables you to hear every enemy sound and gunshot from different directions as if you are right in the middle of the action. The virtual 7.1 surround sound feature provides a nearly accurate representation of real-life audio environments, adding to your gaming experience by immersing you in the gameplay.
This device has an elegant mic system with mic monitoring. The mic-monitoring design helps you to hear your voice so that you can raise and lower it accordingly.LucidSound LS41 wireless headset has a metal frame and quick access control system.
- 7.1 surround
- Sound Built for Immersive Gaming:
- All-day Comfort:
- Retractable Noise Cancelling Microphone:
- In-line Audio Controls:
Things We Liked
Things We Didn’t Like
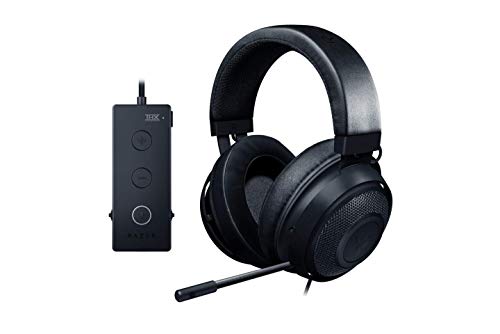
This headset from Razer is the successor of Kraken Pro V2 and comes in a striking black color. The features that make it stand out among durable headsets for Call of Duty include superior sound isolation, retractable microphone with active noise cancellation feature, and lightweight design with 40 mm driver unit.
The voice quality is crystal-clear thanks to the improved drivers that offer high-definition sound. It has a detachable hanger which you can attach inside your shirt during game sessions so that the headset does not dangle around or bounce around while moving quickly from one point to another. This headset offers good value for money thanks to its slick, innovative features and durability which can withstand long-term usage.
- 7.1 Surround Sound Capable:
- Sound Built for Immersive Gaming:
- All-day Comfort:
- Retractable Noise Cancelling Microphone:
- In-line Audio Controls:
Things We Liked
Things We Didn’t Like
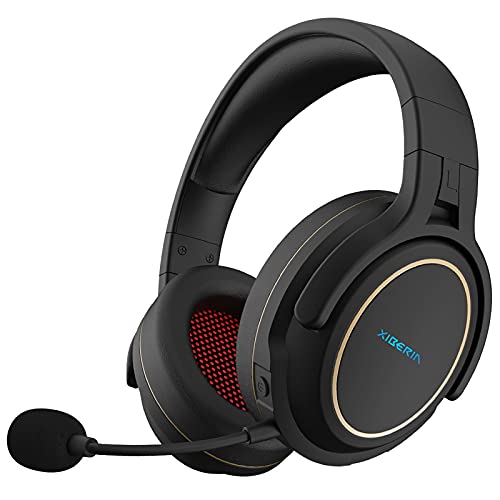
This headset is a budget-friendly choice for gamers who want a durable yet affordable headset without compromising on quality. It offers a long battery life of up to 15 hours with a full charge and an additional range of 20 feet. It comes with a built-in Mic Monitor feature that enables you to hear your voice which can be helpful during online gaming sessions where you need to communicate clearly and loudly without raising the volume too high.
- ➤ Lossless 2.4GHz wireless
- ➤ All Day Ready To Play
- ➤ G01 wireless headset
- ➤Unidirectional Noise Cancelling Mic
- ➤ 90°rotating earmuffs
Things We Liked
Things We Didn’t Like
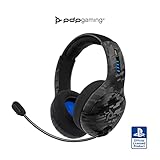
Noise Cancelling Microphone is a great choice for gamers who are looking for good quality audio. The headset comes with 50mm drivers that provide rich and clear sound, as well as noise-cancelling microphones to ensure you can communicate with your team clearly. Additionally, the headset features a comfortable design that will stay in place even during intense gaming sessions.
Another great feature of the PDP Gaming LVL50 Wireless Stereo Headset is its comfortable design. The headset features soft ear cups and a headband that provides long-lasting comfort even during extended use. Additionally, the headset can be easily adjusted to fit any head size. This makes PDP Gaming LVL50 Wireless Stereo Headset perfect for gamers of all ages.

- WIRELESS HEADSET WITH MIC
- POWERFUL PRO AUDIO
- NOISE-CANCELING BOOM MIC
- ALL-DAY COMFORT
- NEXT-GEN GAMING
Things We Liked
Things We Didn’t Like
Conclusion
In this article, we have reviewed four top-rated headsets for Call of Duty from different brands and guarantee you full value for your money. They are made using high-quality material and possess unique characteristics that set them apart from one another. We recommend you go through each review carefully before deciding on the right durable headset for your PS4.
The price may vary depending on the features, design, durability, and overall performance of these products. However, we believe they are worth every penny.
LucidSound LS41 Wireless Gaming Headset for PS4, Xbox One, PC, Nintendo Switch, Mac, DTS Headphone: X 7.1 Gaming headphones - PlayStation 4
The LucidSound LS41 Wireless Gaming Headset is the best headset for Call of Duty on the PS4. The headset has a great look, being sleek and modern. The headset also has multi-game compatibility and a 20+ hour battery life with a modern dual-mic system. In addition, the headset is highly versatile and durable.

